Nagios installation and configuration with NagiosQL
Nagios installation and configuration with NagiosQL
Table of Contents
ToggleNagios Installation and Configuration
NagiosQL provides a GUI interface to manage your all Nagios configurations.
You can add hosts, host groups, contacts, contacts groups, etc. Let’s have a
look for its installation and its configuration. Let’s install Nagios core first
and then will go ahead with NagiosQL.

Step 1:  Install required dependencies: We need to install Apache, PHP and some
libraries like gcc, glibc, glibc-common and GD libraries and its development
libraries before installing Nagios 4.4.5 with the source.
# yum install httpd httpd-tools php gcc glibc glibc-common gd gd-devel make net-snmStep 2: Create Nagios User and Group and set password.
# useradd nagios
# passwd nagios
# groupadd nagcmd
Next, add both the nagios user and the apache user to the
nagcmd group using usermod command.
# usermod -G nagcmd nagios
# usermod -G nagcmd apache
Step 3: Download Nagios packages and save it on server at any
location.
# mkdir /nagios-pkg
# cd /nagios-pkg

# wget https://assets.nagios.com/downloads/nagioscore/releases/nagios-4.4.5.tar.gz

# wget https://nagios-plugins.org/download/nagios-plugins-2.2.1.tar.gz

# ls -l
total 13708
-rw-r--r--. 1 root root 11304463 Apr  2 18:13 nagios-4.4.5.tar.gz
-rw-r--r--. 1 root root  2728818 Apr  2 18:13 nagios-plugins-2.2.1.tar.gz
Step 4: Extract both the packages.
# tar -zxvf nagios-4.4.5.tar.gz
# tar -zxvf nagios-plugins-2.2.1.tar.gz

# ls -ltrh
total 14M
drwxr-xr-x. 15 root root 4.0K Apr 19  2017 nagios-plugins-2.2.1
drwxrwxr-x. 20 root root 4.0K Aug 20  2019 nagios-4.4.5
-rw-r--r--.  1 root root  11M Apr  2 18:13 nagios-4.4.5.tar.gz
-rw-r--r--.  1 root root 2.7M Apr  2 18:13 nagios-plugins-2.2.1.tar.gz
Step 5: Configure Nagios Core
# cd nagios-4.4.5

# ./configure --with-command-group=nagcmd

----
----
----
----
*** Configuration summary for nagios 4.4.5 2019-08-20 ***:

 General Options:
 -------------------------
        Nagios executable:  nagios
        Nagios user/group:  nagios,nagios
       Command user/group:  nagios,nagcmd
             Event Broker:  yes
        Install ${prefix}:  /usr/local/nagios
    Install ${includedir}:  /usr/local/nagios/include/nagios
                Lock file:  /run/nagios.lock
   Check result directory:  /usr/local/nagios/var/spool/checkresults
           Init directory:  /lib/systemd/system
  Apache conf.d directory:  /etc/httpd/conf.d
             Mail program:  /usr/bin/mail
                  Host OS:  linux-gnu
          IOBroker Method:  epoll

 Web Interface Options:
 ------------------------
                 HTML URL:  http://localhost/nagios/
                  CGI URL:  http://localhost/nagios/cgi-bin/
 Traceroute (used by WAP):


Review the options above for accuracy.  If they look okay, type 'make all' to compile the main program and CGIs.

# make all

----
----
*** Compile finished ***
We will go ahead with “make install” and rest.
# make install

---
---
*** Main program, CGIs and HTML files installed ***

You can continue with installing Nagios as follows (type 'make'
without any arguments for a list of all possible options):

  make install-init
     - This installs the init script in /lib/systemd/system

  make install-commandmode
     - This installs and configures permissions on the
       directory for holding the external command file

  make install-config
     - This installs sample config files in /usr/local/nagios/etc

make[1]: Leaving directory `/nagios-pkg/nagios-4.4.5'

# make install-init
/usr/bin/install -c -m 755 -d -o root -g root /lib/systemd/system
/usr/bin/install -c -m 755 -o root -g root startup/default-service /lib/systemd/system/nagios.service

# make install-commandmode
/usr/bin/install -c -m 775 -o nagios -g nagcmd -d /usr/local/nagios/var/rw
chmod g+s /usr/local/nagios/var/rw

*** External command directory configured ***


# make install-config
/usr/bin/install -c -m 775 -o nagios -g nagios -d /usr/local/nagios/etc
/usr/bin/install -c -m 775 -o nagios -g nagios -d /usr/local/nagios/etc/objects
/usr/bin/install -c -b -m 664 -o nagios -g nagios sample-config/nagios.cfg /usr/local/nagios/etc/nagios.cfg
/usr/bin/install -c -b -m 664 -o nagios -g nagios sample-config/cgi.cfg /usr/local/nagios/etc/cgi.cfg
/usr/bin/install -c -b -m 660 -o nagios -g nagios sample-config/resource.cfg /usr/local/nagios/etc/resource.cfg
/usr/bin/install -c -b -m 664 -o nagios -g nagios sample-config/template-object/templates.cfg /usr/local/nagios/etc/objects/templates.cfg
/usr/bin/install -c -b -m 664 -o nagios -g nagios sample-config/template-object/commands.cfg /usr/local/nagios/etc/objects/commands.cfg
/usr/bin/install -c -b -m 664 -o nagios -g nagios sample-config/template-object/contacts.cfg /usr/local/nagios/etc/objects/contacts.cfg
/usr/bin/install -c -b -m 664 -o nagios -g nagios sample-config/template-object/timeperiods.cfg /usr/local/nagios/etc/objects/timeperiods.cfg
/usr/bin/install -c -b -m 664 -o nagios -g nagios sample-config/template-object/localhost.cfg /usr/local/nagios/etc/objects/localhost.cfg
/usr/bin/install -c -b -m 664 -o nagios -g nagios sample-config/template-object/windows.cfg /usr/local/nagios/etc/objects/windows.cfg
/usr/bin/install -c -b -m 664 -o nagios -g nagios sample-config/template-object/printer.cfg /usr/local/nagios/etc/objects/printer.cfg
/usr/bin/install -c -b -m 664 -o nagios -g nagios sample-config/template-object/switch.cfg /usr/local/nagios/etc/objects/switch.cfg

*** Config files installed ***

You will get *SAMPLE* config files.  You’ll go ahead and make required changes.
Step 5: You can customize something here. Like you can update
email id in below file:
# vi /usr/local/nagios/etc/objects/contacts.cfgStep 6: Install and Configure Web Interface for Nagios
We are done with all configuration in the back end, now
we will configure Web Interface for Nagios with the following
command. The below command will Configure Web interface for
Nagios and a web admin user will be created “nagiosadmin”.
# make install-webconf

/usr/bin/install -c -m 644 sample-config/httpd.conf /etc/httpd/conf.d/nagios.conf
if [ 0 -eq 1 ]; then \
        ln -s /etc/httpd/conf.d/nagios.conf /etc/apache2/sites-enabled/nagios.conf; \
fi

*** Nagios/Apache conf file installed ***
Create a password for “nagiosadmin”
#  htpasswd -s -c /usr/local/nagios/etc/htpasswd.users nagiosadmin	(qwerty)
New password:
Re-type new password:
Adding password for user nagiosadmin

Restart apache service to make changes.

# systemctl start httpd
Step 7: Compile and install Nagios plugin
# ./configure --with-nagios-user=nagios --with-nagios-group=Nagios
# make
# make install
Step 8: Verify Nagios Configuration
# /usr/local/nagios/bin/nagios -v /usr/local/nagios/etc/nagios.cfg


Nagios Core 4.4.5
Copyright (c) 2009-present Nagios Core Development Team and Community Contributors
Copyright (c) 1999-2009 Ethan Galstad
Last Modified: 2019-08-20
License: GPL

Website: https://www.nagios.org
Reading configuration data...
   Read main config file okay...
   Read object config files okay...

Running pre-flight check on configuration data...

Checking objects...
        Checked 8 services.
        Checked 1 hosts.
        Checked 1 host groups.
        Checked 0 service groups.
        Checked 1 contacts.
        Checked 1 contact groups.
        Checked 24 commands.
        Checked 5 time periods.
        Checked 0 host escalations.
        Checked 0 service escalations.
Checking for circular paths...
        Checked 1 hosts
        Checked 0 service dependencies
        Checked 0 host dependencies
        Checked 5 timeperiods
Checking global event handlers...
Checking obsessive compulsive processor commands...
Checking misc settings...

Total Warnings: 0
Total Errors:   0

Things look okay - No serious problems were detected during the pre-flight check
Step 9: Enable Nagios and httpd service to boot so that
services will be automatically on after boot.
# systemctl enable httpd
# systemctl enable nagios

Start Nagios service and login to its web interface.

# systemctl start nagios
Note: Either disable firewall or add required ports.
Configure NagiosQL
Step 1: Install required packages
# yum install libssh2 libssh2-devel mysql mysql-server php-mysql php-pear php-devel

# pecl install channel://pecl.php.net/ssh2-0.12
Step 2: Download NagiosQL3 archive packages and untar
# cd /usr/local/nagios/share/

# wget http://sourceforge.net/projects/nagiosql/files/nagiosql/NagiosQL%203.2.0/nagiosql_320.tar.gz

# ls -l nagiosql-3.4.1-git2020-01-19.tar.gz
-rw-r--r--. 1 root root 1500835 Apr  2 19:39 nagiosql-3.4.1-git2020-01-19.tar.gz

# tar -zxvf nagiosql-3.4.1-git2020-01-19.tar.gz

# mv nagiosql-3.4.1 webadmin

# chown -R apache:apache .

# chmod -R 775 .
Step 3: Now go ahead and edit /etc/php.ini and add time zone
as per your location.
date.timezone = 'Asia/Kolkata'

Restart apche services.

# systemctl restart httpd
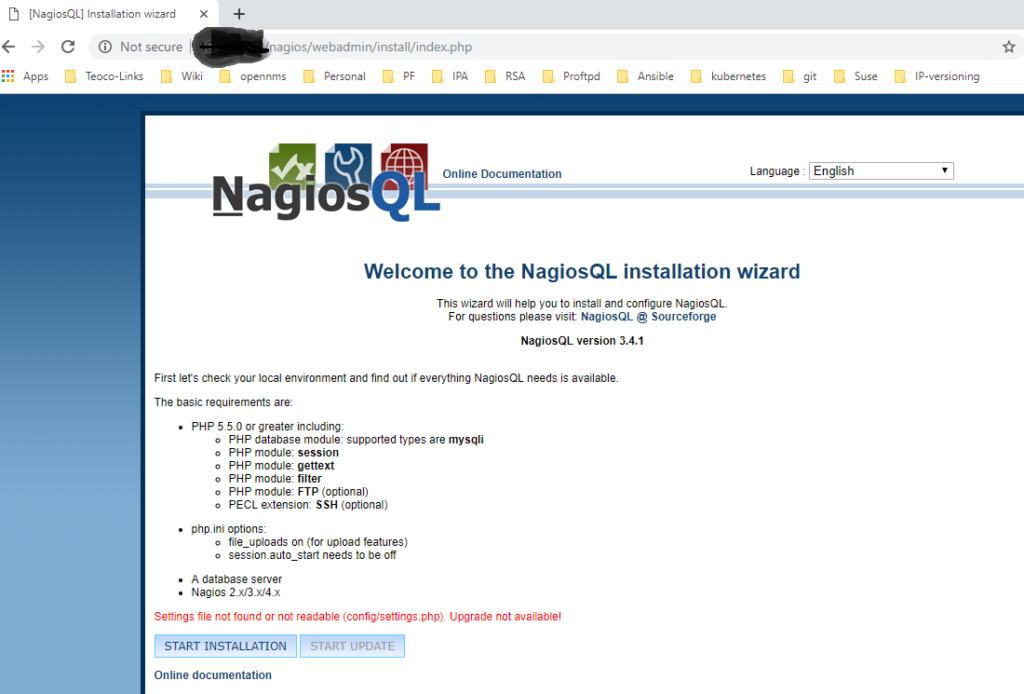
Step 4: Start NagiosQL3 web installer.
Open link in browser:
http://IP Address/nagios/webadmin/install/index.php
It will ask for credential. Login it with nagiosadmin and
click on “Start Installation”.

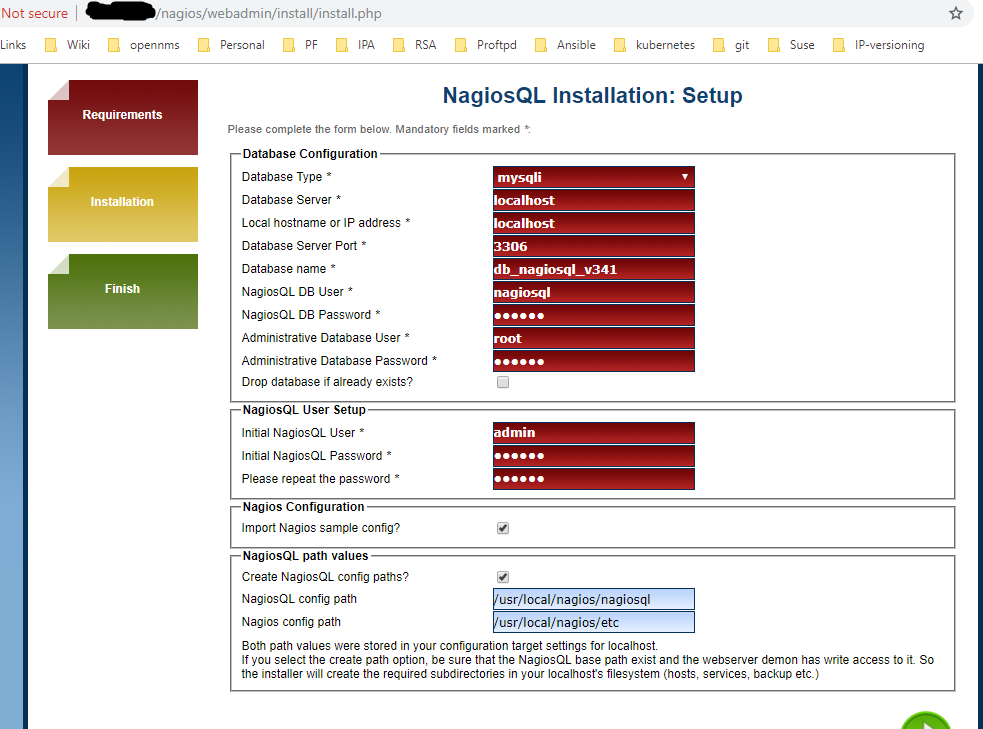
It will verify requirements if you see any error fix it and
click on next. Now fill all required details in next page and
click on next. This page has password, database name etc. So,
note down all required details.
# cd /usr/local/nagios
# mkdir nagiosql
# chmod -R 775 nagiosql
# chown -R nagios.apache nagiosql
Sometime you’ll get some errors and you may have your solutions
as of now I got min few errors, I got. Fixed with below
commands:
# yum install mariadb*
# mysqladmin -u root password <password>
# mysql -u root –p	(login check with password)
# cd /usr/local/nagios
# mkdir nagiosql
# chmod -R 775 nagiosql
# chown -R nagios.apache nagiosql
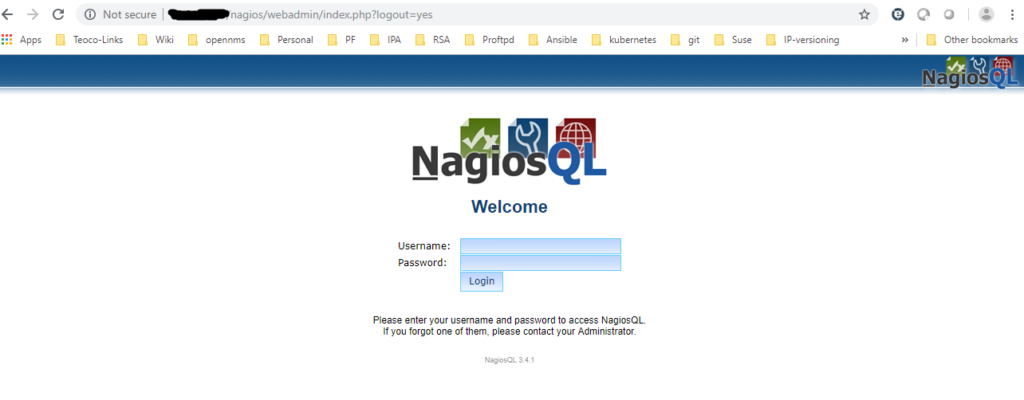
Now, you have login page and you can login via “NagiosQL User”
which you have set in last step.

Related
Loading repositories and latest updates...
Recent Posts
Recent Blog
- Tanisha Yirawala on Difference between Connection-oriented protocols vs Connectionless Protocols
- OlpWriple on Installation of Linux Operating System (Red Hat 8) in VMWare Workstation
- Berenice Saenz on Difference between Connection-oriented protocols vs Connectionless Protocols
- Chloe Adams on Difference between Connection-oriented protocols vs Connectionless Protocols
- Taylor Swift on Difference between Connection-oriented protocols vs Connectionless Protocols
Interview Q&A
- May 2025
- March 2025
- November 2024
- October 2024
- September 2024
- July 2024
- June 2024
- May 2024
- March 2024
- February 2024
- January 2024
- November 2023
- October 2023
- September 2023
- August 2023
- July 2023
- April 2023
- March 2023
- January 2023
- December 2022
- November 2022
- October 2022
- September 2022
- August 2022
- May 2022
- April 2022
- March 2022
- February 2022
- January 2022
- November 2021
- September 2021
- August 2021
- July 2021
- June 2021
 Visit My GitHub VARELITE
Excellent Post